Cost allocation
The Cost Allocation page enables you to distribute cloud costs across teams, departments, and business units. Whether you need informal visibility (showback) or formal internal billing (chargeback), CLARITY provides the tools to build a complete cost accountability framework.
Page tabs
The Cost Allocation page is organized into seven tabs:
| Tab | Purpose |
|---|---|
| Showback | Tag-based cost distribution for visibility |
| Statements | Monthly chargeback statements with a labelled period picker (prev / next chevrons; auto-jumps to the latest populated month on first load) |
| ROI Report | Counterfactual savings — what you actually spent vs what you would have spent without CLARITY's optimisations |
| Business Insights | Per-cost-center accountability — orphan spend banner, spend-and-findings cards, AI tag suggestions, savings scorecard |
| Cost Centers | CRUD for the cost centers themselves (name, owner, monthly revenue, business dimension) |
| Rules | Define how costs are matched to cost centers (tag-based, service-based, K8s namespace, proportional fallback) |
| Tag Health | Tag coverage dashboard, aliases, untagged resource explorer (replaces the standalone Governance page) |
Deep-linking
Each tab is addressable by URL — e.g. /showback?tab=tag-health or /showback?tab=roi-report. The Dashboard's tag-coverage card uses these URLs so "Review tags →" lands you directly on the Tag Health tab.
Tag-coverage gate
When tag coverage on the selected account drops below 80%, an inline warning appears at the top of the page (above all tabs). It explains how the gap distorts chargeback statements and links to the Tag Health tab. Two actions:
- Fix tags — jumps to Tag Health.
- Ignore for now — the warning collapses to a small
🔕 Tag warning hidden — click to showpill at the top of the page. Click the pill to bring back the full panel. The pill state lives for the current browser tab session; the warning re-appears next session because tag governance is a habit, not a one-time setup.
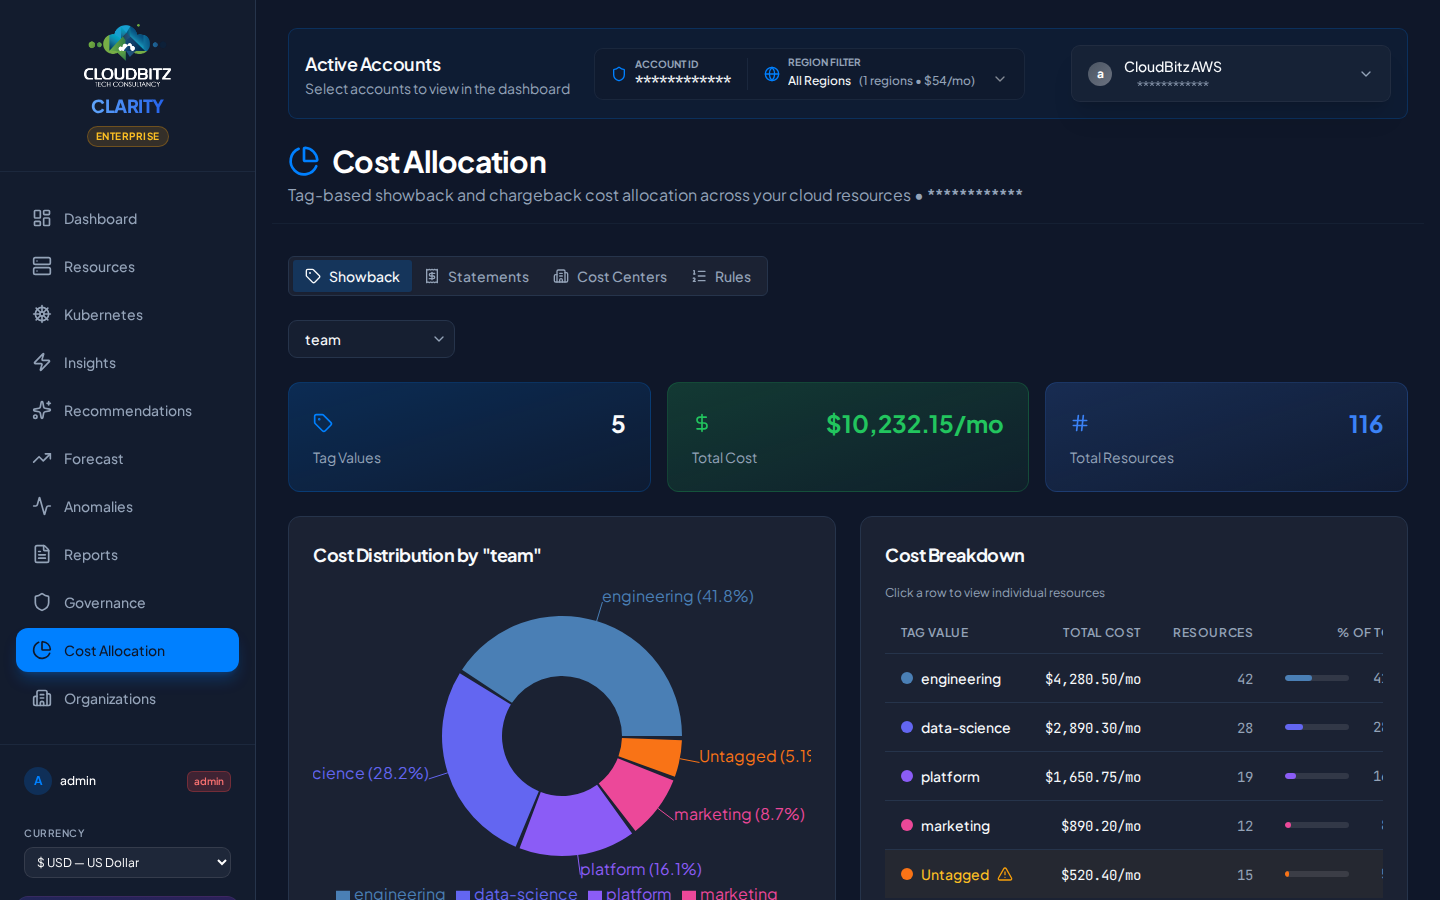
Showback
Showback provides cost visibility by distributing cloud spend based on resource tags. It answers the question: "How much is each team spending?"
How it works
- CLARITY reads tags from all discovered resources
- Costs are grouped by the tag keys you select (e.g.,
team,department,project) - A breakdown shows total spend per tag value
Drill-Down
Click any tag group to drill into:
- The services driving cost within that group
- Individual resources and their costs
- Trend over the selected time period
TIP
Showback works best when your tagging strategy is consistent. Use the Governance page to track tag compliance and identify untagged resources.
Chargeback
Chargeback goes beyond visibility — it assigns costs to formal cost centers that map to your organization's financial structure.
Cost centers
A cost center represents a team, department, project, or business unit that is responsible for a portion of cloud spend. Create cost centers that match your internal accounting structure:
- Engineering
- Data Science
- Marketing Platform
- Shared Infrastructure
Each cost center has:
- A unique name and description
- An optional budget limit
- An owner or contact
Default cost center
One cost center is designated as the default. Any cloud costs that do not match any allocation rule are automatically assigned to the default cost center.
WARNING
Always configure a default cost center. Without one, unmatched costs will not appear in chargeback statements, creating blind spots in your cost accountability.
Allocation rules
Allocation rules define the logic for matching cloud costs to cost centers. Rules use a 3-layer cascade evaluation — scoped rules are evaluated before global rules, and within each scope, priority determines the winner.
Rule scoping
Each rule can be scoped to a specific level of your cloud infrastructure:
| Scope | Applies To | Use Case |
|---|---|---|
| Account | A single cloud account (credential) | Account-specific tagging conventions |
| Provider | All accounts of one provider (AWS, Azure, or GCP) | Provider-wide allocation patterns |
| Global | All accounts across all providers | Organization-wide default rules |
Rules are evaluated narrowest to widest: account-scoped rules are checked first, then provider-scoped, then global. Within each scope level, priority determines the order. This cascade ensures that a team's AWS-specific tagging convention never accidentally captures costs from their Azure account.
INFO
Existing rules created before scoping was introduced default to Global scope, so they continue to work exactly as before — no migration needed.
Rule conditions
Each rule specifies one or more conditions:
| Condition Type | Example |
|---|---|
| Service | Match all EC2 or Azure VM costs |
| Sub-service | Match all NatGateway-Bytes rows across the org (stable provider SKU, see below) |
| Tag | Match resources tagged team:data-science |
| Resource Type | Match all S3 buckets or Cloud SQL instances |
| K8s Namespace | Match costs from the production namespace |
| Provider | Match all AWS or GCP costs |
| Region | Match resources in us-east-1 |
TIP
Tag-based rules are alias-aware — if you have set up tag aliases (see Tag Health below), rules matching Environment will automatically match resources tagged env, Env, or any other alias you have defined.
Sub-service rule (usage_type)
Cost Explorer / Azure Cost Management / GCP BigQuery export return aggregate buckets like EC2 - Other or Bandwidth that hide their underlying line items. CLARITY decomposes those into named sub-services such as EC2 / NAT Data Processing or S3 / Requests (GET Standard), and stamps each cost row with the structured provider SKU (NatGateway-Bytes, CloudNat-Bytes, PD-Snapshot-Standard).
Sub-service rules match on the structured SKU rather than the friendly label. That matters because:
- The friendly label is mutable — CLARITY occasionally tweaks it for clarity. A rule keyed on the SKU survives those refactors.
- The same SKU can appear under different friendly labels in two providers' billing data. The structured value is the stable identifier.
To create a sub-service rule: pick Sub-service as the rule type, then choose from the dropdown. The list is populated from the same data source as the Resources page sub-service filter — every value you can filter resources by is also a rule target.
Cross-cloud is deliberately not auto-bridged
AWS NatGateway-Bytes and GCP CloudNat-Bytes are distinct SKUs even though both render as "NAT data processing" in some UI contexts. A customer wanting both creates two rules pointing at the same cost center — explicit is safer than implicit.
Priority system
When multiple rules within the same scope could match the same cost, priority determines which rule applies:
- Priority 100 is evaluated before priority 50
- If no rule matches at any scope level, the cost goes to the default cost center
- You can reorder rules by adjusting their priority values
Creating a rule
- Click Add Rule in the Allocation Rules tab
- Select the scope — All Accounts (global), a specific provider, or a specific account
- Select the target cost center
- Add one or more conditions (conditions within a rule use AND logic)
- Set the priority (higher number = evaluated first)
- Save and preview which resources the rule would match
TIP
Start with broad global rules (e.g., all costs tagged department:engineering go to the Engineering cost center) and add account-scoped rules for exceptions. The cascade ensures specific rules always take precedence over general ones.
Statements
Monthly chargeback statements provide a formal record of cost allocation for each billing period.
Period picker
A labelled Period selector at the top of the tab lets you navigate between months:
◀/▶chevron buttons step through months that actually have statements (skipping over empty periods).- Native month input — type or click directly to jump to any YYYY-MM.
- Auto-jump on first load — if the current month has no statements yet, the page automatically lands you on the most recent month that does. The auto-jump is one-time per visit; once you make a manual selection, your pick is honoured.
- Empty-period hint — when you've manually selected a month with no statements, the input border turns amber and an inline hint reads
Empty period · latest: <YYYY-MM>so you don't think the feature is broken.
Account scope
Before generating a statement, select which cloud accounts to include using the account dropdown:
- All Accounts — Allocate costs from every connected account (default)
- Specific account — Generate a statement scoped to a single cloud account (e.g., only your production AWS account)
This lets you produce separate chargeback statements per account, or a combined view across all accounts.
What's in a statement
Each statement includes:
- Billing period — The month covered
- Per-center breakdown — Total cost allocated to each cost center
- Unallocated costs — Any spend assigned to the default cost center
- Rule matches — Which allocation rules applied
- Trend comparison — Month-over-month change per cost center
Generating statements
Statements are generated at the end of each billing period. You can also generate a mid-month preview to see the current allocation status.
Print / export
Click the Print button to open a print-friendly version of the statement in a new window. The printable view includes:
- Statement title with billing period and account scope
- Summary KPIs (total allocated, unallocated, total cost)
- Full cost center breakdown table with owner, allocated cost, resources, and percentage
- Default cost center highlighted for quick identification
- CLARITY footer with generation timestamp
Use your browser's print dialog to save as PDF or send to a printer. This format is designed for IT departments to use as internal billing documentation.
Tag health
The Tag Health tab provides a unified view of your tagging quality, compliance scoring, and tools to normalize tags across providers and accounts. It consolidates all tag governance capabilities into a single place alongside cost allocation.
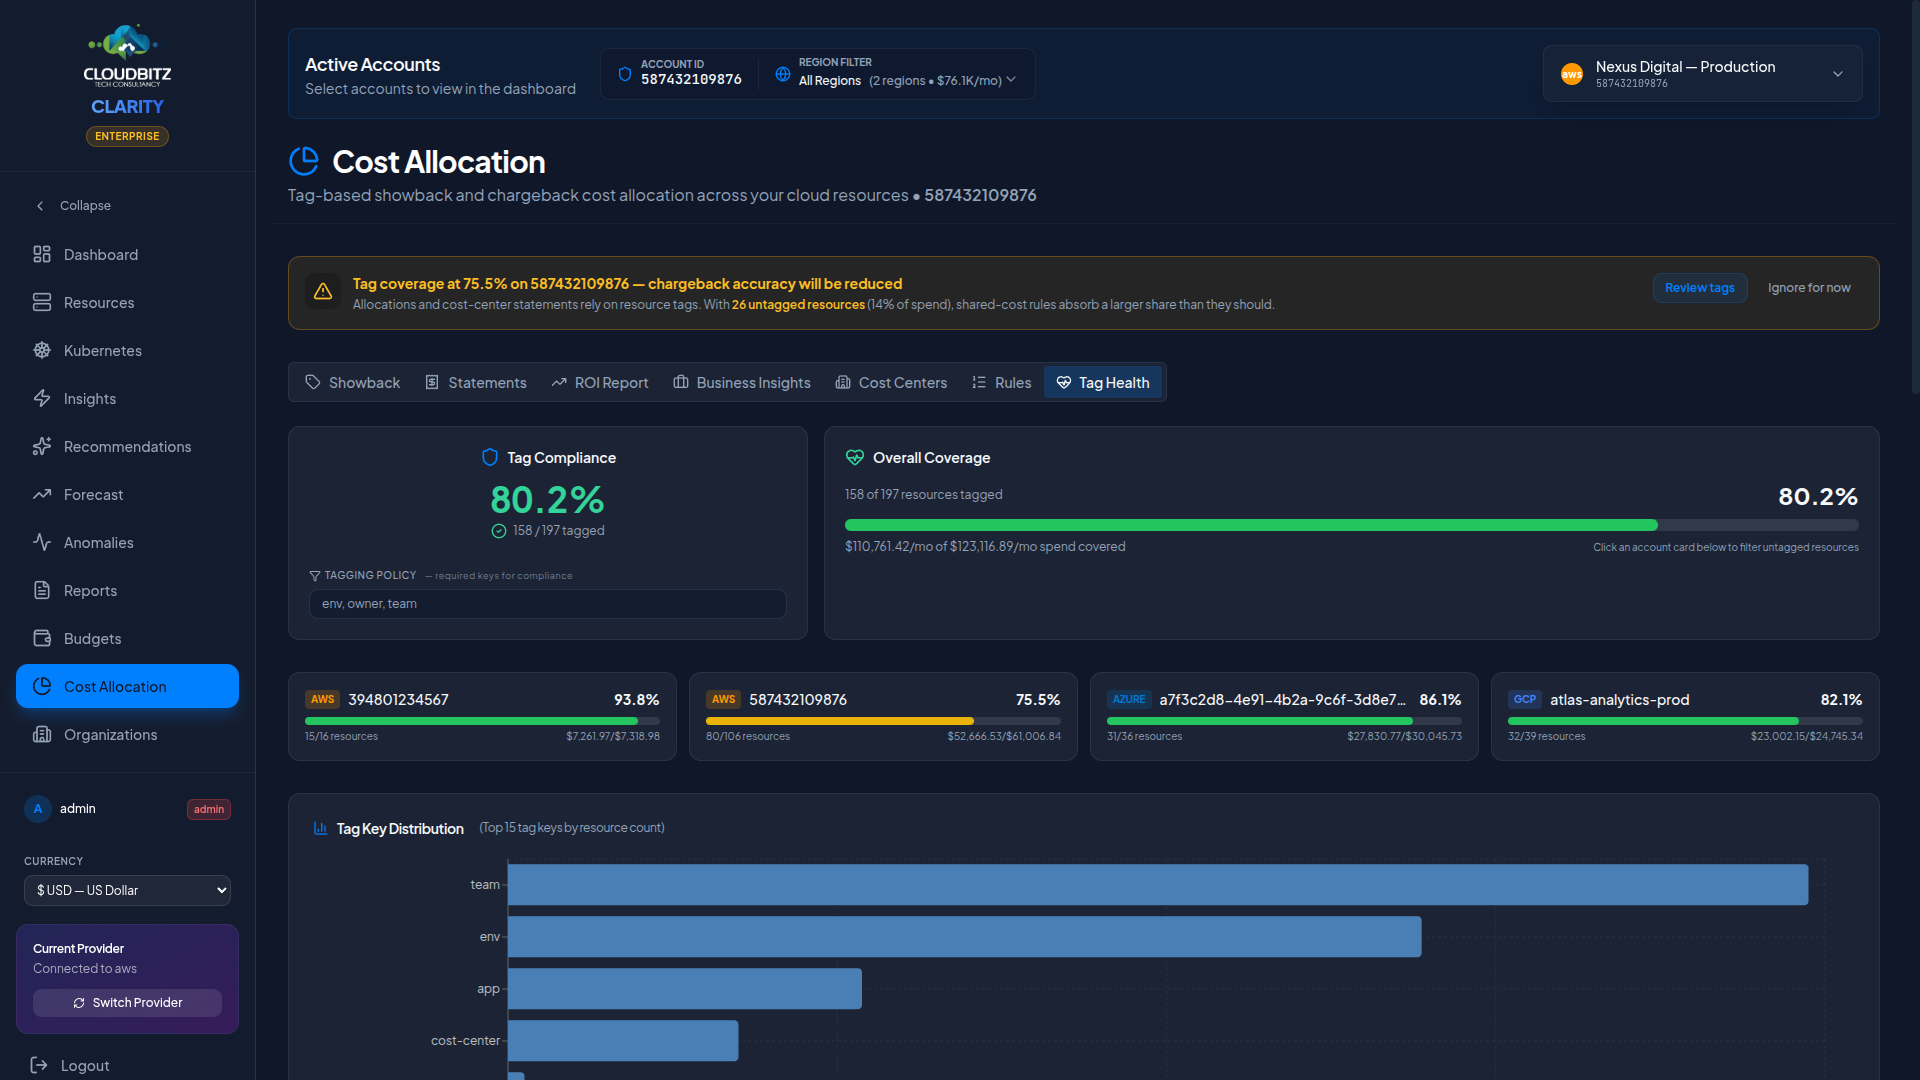
Compliance scoring
At the top of the Tag Health tab, a compliance badge shows the overall percentage of resources that meet your tagging policy. The policy is a saved list of tag-keys your org considers mandatory (env, owner, team is a common starting point) — define it once in the policy field, click Save policy, and every visit thereafter scores compliance against it. No retyping each session.
Two important details:
Alias-aware compliance. If you've set up tag aliases below, the compliance check applies them first. A resource tagged
Team=engineeringcounts as having keyteamwhen an aliasTeam→teamexists. Same alias map drives both compliance and chargeback rule matching, so the two are always consistent.Per-resource missing-keys breakdown. When a policy is saved, the Resources missing required tags table replaces the simple untagged list. Each row shows exactly which keys that resource lacks (
missing: team, owner), so you can fix the specific gaps instead of guessing.
Coverage dashboard
Next to the compliance badge, the coverage dashboard shows the percentage of resources and spend that have at least one tag:
- Overall coverage bar — Total tagged resources vs. total resources across all accounts, with the monetary impact of tagged vs. untagged spend
- Per-account cards — Each connected account shows its tag coverage with a color-coded progress bar (green ≥75%, yellow 50-74%, red <50%). Click any card to filter the untagged resources list below to that specific account.
TIP
Focus on improving coverage for accounts with high spend and low tag coverage — this gives you the biggest improvement in allocation accuracy per effort invested.
Tag key distribution
A horizontal bar chart shows the top 15 tag keys by resource count across all your accounts. This helps you understand which tag keys are most and least applied, and identify gaps in your tagging strategy — for example, if environment appears on 150 resources but cost-center only appears on 30.
Tag aliases (advanced)
Tag aliases live behind an Advanced disclosure on the Tag Health tab — collapsed by default because most customers shouldn't need them. The right answer to inconsistent tag-key spellings is to fix it at the cloud-provider level: AWS Tag Policies, Azure Policy, or GCP Organization Policy can enforce a canonical key across new resource creation. Aliases are a workaround for the cases where that's impractical (large enterprises with years of accumulated tagging debt, post-acquisition resource pools you can't realistically retag).
What aliases do: map tag-key variants (Environment, env, Env, environment) to a single canonical key (env). CLARITY's chargeback rules and Tag Health compliance treat any of the variants as equivalent to the canonical key.
Internal to CLARITY only. We do not modify the tags on your actual cloud resources — no AWS/Azure/GCP console changes, no CLI calls. Aliases only change how this app interprets your existing tags. Resources keep whatever spelling they have in your cloud.
Auto-detection: CLARITY scans all tag keys across your accounts and suggests alias groups by comparing keys case-insensitively and ignoring separators (hyphens, underscores). Click Map All on a suggestion to create all aliases in one action.
Manual aliases: Create custom aliases for tag keys that auto-detection does not catch. Each alias maps an alternate key to a canonical key, and can be scoped to a specific account or applied globally.
How aliases work in allocation: When a chargeback rule matches on tag key Environment, CLARITY automatically checks all known aliases. A resource tagged env:production will match a rule looking for Environment:production if env is aliased to Environment.
Untagged resource explorer
Browse resources that have no tags at all, ranked by monthly cost. For each untagged resource, you can see:
- Resource name, type, and ARN
- Cloud provider and account
- Service category and region
- Monthly cost impact
Use this list to prioritize tagging remediation — start with the most expensive untagged resources. See the Governance page for a broader view of tag compliance and improvement strategies.
Setting up a basic chargeback workflow
Follow these steps to get started:
Step 1: create cost centers
Define your organizational units. Start with 3-5 top-level cost centers that map to your team or department structure.
Step 2: establish tagging standards
Ensure resources are tagged consistently. At minimum, adopt a team or department tag across all providers.
Step 3: define allocation rules
Create rules that match tags, services, or namespaces to cost centers. Set priorities so that specific rules override general ones.
Step 4: designate a default cost center
Assign a default cost center (often "Shared Infrastructure" or "Unallocated") to catch costs that do not match any rule.
Step 5: review and iterate
Generate a preview statement and review the allocation. Adjust rules and priorities until the distribution reflects your organization's reality.
INFO
Cost allocation is most effective when combined with consistent tagging. Use CLARITY's governance features to enforce tagging standards and improve allocation accuracy over time.
What's next?
- Generate reports with allocation data — including the Cross-Account Executive report
- Improve tag compliance
- Track organization-level costs